You’ve probably heard the buzz about sous vide cooking, but aren’t quite sure if it’s just another kitchen fad or the secret to achieving flawless meals at home.
If you’ve struggled with dry chicken, overcooked steak, or inconsistent results no matter how carefully you follow a recipe, you’re not alone. Traditional methods leave too much up to chance.
That’s where sous vide cooking comes in. This guide is here to cut through the mystery and show you how this precision technique takes out the guesswork and delivers perfect doneness—every single time.
We’ve spent years testing and optimizing real recipes using sous vide cooking, focusing on what actually works in a home kitchen. This isn’t theory—it’s proven practice.
Inside, you’ll learn what sous vide cooking really is, why chefs swear by it for consistency, and how you can start using it immediately to transform how you cook meat, fish, and more.
What is Sous Vide and Why is it the Ultimate in Precision
If you’ve ever overcooked a steak, dried out chicken, or scorched veggies trying to juggle a dozen things in the kitchen, it’s time to consider a smarter path: sous vide cooking.
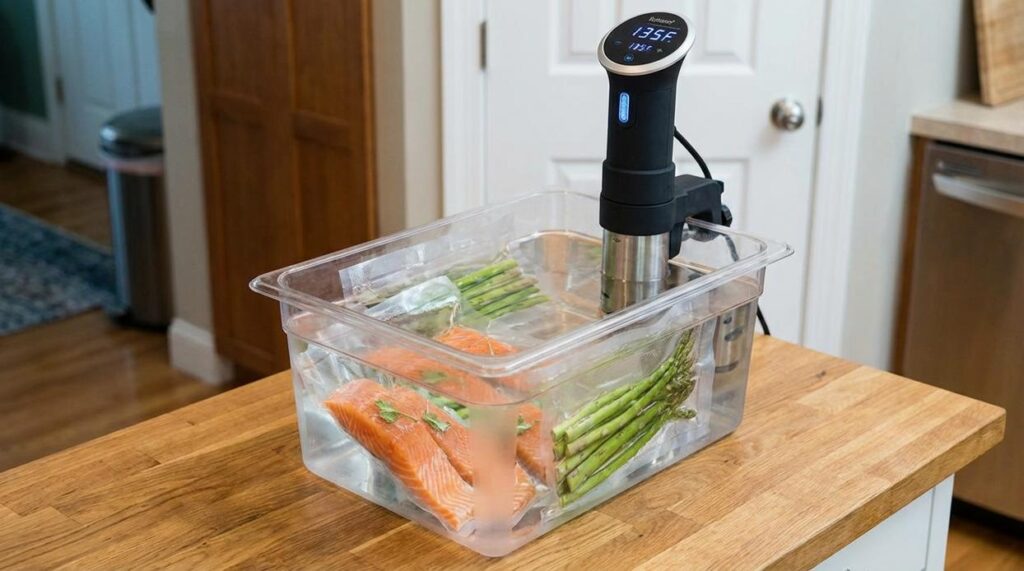
This technique sounds fancy, but it’s beautifully simple. Food is vacuum-sealed in a plastic bag, then submerged in a precisely controlled water bath. Think of it as a gentle jacuzzi for your food—one that guarantees results down to the degree.
Unlike ovens and stovetops, which constantly spike and dip in temperature (we’ve all opened the oven to “just check” and ruined the flow), sous vide heats water to the exact temperature you want your food to reach—then holds it there. That means your steak cooks evenly from edge to edge, no gray band, no guesswork.
So what should you make with it? Start with proteins: steak, salmon, chicken breast—they’re nearly foolproof. Even eggs and desserts like crème brûlée shine. Pro tip: finish sous vide meats with a quick pan sear for that crispy crust.
For precision, consistency, and peace of mind (goodbye dry turkey), sous vide cooking should be your new go-to. You’ll never look at boiling water—or your frying pan—the same way again.
The Essential Gear for Your Sous Vide Setup
Let’s face it—without the right tools, even the smartest cooking method can turn into a soggy letdown. If you’re aiming for restaurant-level results with sous vide cooking, here’s exactly what you need for a smooth setup.
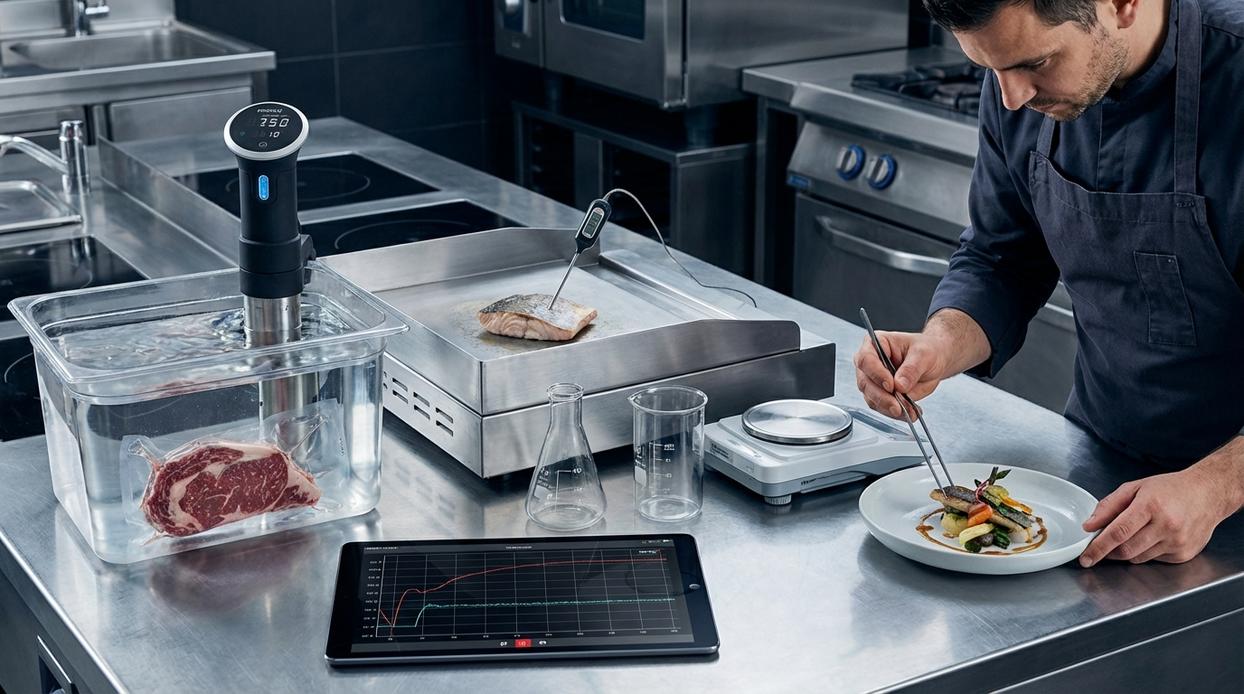
1. The Heart of the Operation: Immersion Circulator
This is your MVP. It heats and circulates water to a precise temperature, giving you total control over doneness. For reliable performance, look for models with at least 1000 watts and a digital timer (Pro tip: Wi-Fi-enabled circulators let you monitor cooks without being tied to the kitchen).
2. The Cooking Vessel
Sure, your basic stockpot works for beginners—but for batch cooking or longer recipes, go for a polycarbonate container. It holds heat better and accommodates racks, keeping your bags in position (no juggling required).
3. Sealing the Deal
Vacuum sealers deliver optimal, air-free seals that prevent floaters. But if you’re just testing the waters, use a zip-top bag with the water displacement method. It’s remarkably effective (and way easier on the wallet).
4. Finishing Touches
After the bath, it’s all about that crust. A cast iron skillet works wonders for meats, while a searing torch adds flair (and flavor) to proteins or veggies—yes, even carrots deserve their moment.
Your First Perfect Cook: A Step-by-Step Sous Vide Guide
Let’s be honest—getting steak just right can feel like a high-stakes game (especially when you’re working with a gorgeous 1.5-inch ribeye). Enter: sous vide cooking.
Still, even with a method this precise, there’s room for doubt. Some chefs argue about exact times and temps. Others swear by pre-searing. But you’re here for a solid start, not the rabbit hole. So, let’s stick to what consistently works.
Step 1: Season and Seal
Start with generous pinches of kosher salt and freshly cracked black pepper. For aromatics, try crushed garlic clove and a sprig of thyme. (Some people toss in butter here—jury’s out on whether it’s necessary, but it doesn’t hurt.) Seal the steak in a vacuum or zip-top bag using the water displacement method. Just make sure no air bubbles remain—those mess with heat transfer.
Step 2: Set Temperature and Time
Want medium-rare? Set your circulator to 131°F/55°C. Medium hits around 140°F/60°C. For our ribeye, 1.5 to 2 hours is usually the sweet spot. Could you go longer? Sure, but texture may turn mushy if you overdo it. Pro tip: Use a clip to keep the bag mid-bath, preventing floaters.
Step 3: The Water Bath
Lower the sealed bag gently into the preheated water. The bag should be fully submerged. If it insists on floating, use a spoon as a weight (yes, really). Then walk away—seriously, let the magic happen.
Step 4: The Critical Final Sear
Here’s where uncertainty creeps in again: not everyone agrees on sear technique. But drying the steak thoroughly with paper towels is non-negotiable. Get a cast iron skillet smoking hot, add a high-smoke point oil, and sear each side for 30–60 seconds. Aim for that Maillard crust you dream about (and Instagram).
Curious about deeper flavor-building? Explore fermentation 101 how to enhance flavors naturally for more kitchen chemistry.
Beyond Steak: Surprising Foods That Excel with Sous Vide
Let’s set the record straight—steak isn’t the only star of the show.
Take vegetables, for instance. Ever tried carrots that are soft but still have a snap? Or asparagus that’s tender without falling apart into sadness? Sous vide cooking lets you lock in that just-right texture. No more guessing when to pull them from the boiling water before they turn to mush.
And don’t get me started on fish. People love to panic over salmon—either it’s underdone or it flakes into chalk. But with sous vide cooking, you nail that buttery texture every single time. Scallops? Silky on the inside, not rubbery like failed calamari.
Now, here’s my personal favorite: poached eggs. They make or break brunch, and I’m not trying to spend my Sunday breaking eggs into whirlpools. With sous vide? Jammy, golden-center perfection, straight from the shell—ideal for ramen or a proper eggs Benedict.
Pro tip: You can also use it for infusing oils, crafting cocktail syrups, or prepping your crème brûlée base. Because why not cook fancy, feel fancy?
Common Sous Vide Mistakes and How to Avoid Them
Let’s be honest—sous vide cooking sounds nearly foolproof. You set the temp, drop in the bag, and voilà. Except…it’s not quite that simple.
Take the floating bag problem. If bags aren’t fully submerged, your food won’t cook evenly. In a 2020 Cook’s Illustrated test, floating bags led to up to a 7°F difference inside proteins (that’s outside the safe zone). The fix? Use metal clips, a heavy spoon inside the vacuum bag, or sous vide weights to keep things anchored.
Next up: that disappointing sear. The science here? A dry surface is essential for the Maillard reaction—the chemical process that causes browning. According to Harold McGee’s On Food and Cooking, steaks with dry exteriors browned 30% more effectively than moist ones. (Pat. Them. Dry.)
Then there’s food safety. According to the USDA, bacteria multiply rapidly between 40°F and 140°F, aka the “danger zone.” That’s why you need to hold foods above 130°F for the proper time—especially for long cooks like short ribs or pork belly.
And finally—seasoning. Salt and strong spices intensify in the vacuum. Overdo it, and you’ll taste nothing but your chili flakes. Pro tip: Season 10–15% less than you would for grilling or roasting. You can always finish later.
Ignore these? You might still eat well, but you won’t eat great.
As you explore the art of sous vide cooking to elevate your culinary skills, you might also be curious about the nutritional benefits of specific ingredients, like whether kayudapu is rich in iron to complement your precision-prepared dishes – for more details, check out our Is Kayudapu Rich In Iron.
Embrace Precision, Master Consistency
Precision shouldn’t be a luxury—it should be your standard. If you’ve ever stressed about slicing into an overcooked steak or apologizing for a dry chicken breast, you’re not alone. Traditional cooking methods leave too much to chance.
With sous vide cooking, you finally eliminate the guesswork. You set the temperature, walk away, and come back to food cooked exactly how you want it—every single time.
You came here to take back control in the kitchen. Now you know how.
No more second-guessing. No more wasted ingredients. Just consistent, mouthwatering results.
Here’s what to do next: Choose just one thing—steak, chicken breast, or even vegetables—and try sous vide cooking this week. You’ll see the difference immediately. Thousands of home cooks are already transforming their meals with this technique. It’s your turn to master consistency—one flawless bite at a time.
 Andrea Malonecion writes the kind of modern cooking techniques content that people actually send to each other. Not because it's flashy or controversial, but because it's the sort of thing where you read it and immediately think of three people who need to see it. Andrea has a talent for identifying the questions that a lot of people have but haven't quite figured out how to articulate yet — and then answering them properly.
They covers a lot of ground: Modern Cooking Techniques, Tutorial Treasures, Ozvelex Fusion Cuisine Experiments, and plenty of adjacent territory that doesn't always get treated with the same seriousness. The consistency across all of it is a certain kind of respect for the reader. Andrea doesn't assume people are stupid, and they doesn't assume they know everything either. They writes for someone who is genuinely trying to figure something out — because that's usually who's actually reading. That assumption shapes everything from how they structures an explanation to how much background they includes before getting to the point.
Beyond the practical stuff, there's something in Andrea's writing that reflects a real investment in the subject — not performed enthusiasm, but the kind of sustained interest that produces insight over time. They has been paying attention to modern cooking techniques long enough that they notices things a more casual observer would miss. That depth shows up in the work in ways that are hard to fake.
Andrea Malonecion writes the kind of modern cooking techniques content that people actually send to each other. Not because it's flashy or controversial, but because it's the sort of thing where you read it and immediately think of three people who need to see it. Andrea has a talent for identifying the questions that a lot of people have but haven't quite figured out how to articulate yet — and then answering them properly.
They covers a lot of ground: Modern Cooking Techniques, Tutorial Treasures, Ozvelex Fusion Cuisine Experiments, and plenty of adjacent territory that doesn't always get treated with the same seriousness. The consistency across all of it is a certain kind of respect for the reader. Andrea doesn't assume people are stupid, and they doesn't assume they know everything either. They writes for someone who is genuinely trying to figure something out — because that's usually who's actually reading. That assumption shapes everything from how they structures an explanation to how much background they includes before getting to the point.
Beyond the practical stuff, there's something in Andrea's writing that reflects a real investment in the subject — not performed enthusiasm, but the kind of sustained interest that produces insight over time. They has been paying attention to modern cooking techniques long enough that they notices things a more casual observer would miss. That depth shows up in the work in ways that are hard to fake.