If you’ve ever tasted the tang of sauerkraut, the fizz of kombucha, or the deep umami of miso, you’ve already encountered the magic of fermentation.
You’re here because you’re curious—maybe even a little unsure—about how to bring that magic into your own kitchen. Fermentation sounds scientific and complicated, but it doesn’t have to be. In fact, some of the most flavorful and nutritious foods are created through surprisingly simple processes.
This article is your shortcut to understanding the fundamentals. We’ll break down fermentation techniques into clear, approachable steps, so you can start confidently creating delicious, gut-friendly foods at home.
We’ve studied the science and simplified the process—no guesswork, no overwhelm. Just real methods, real ingredients, and results you can taste.
By the end, you’ll grasp all four major fermentation techniques and know exactly how to start applying them—whether you’re aiming for your first jar of kimchi or chasing the perfect kombucha brew.
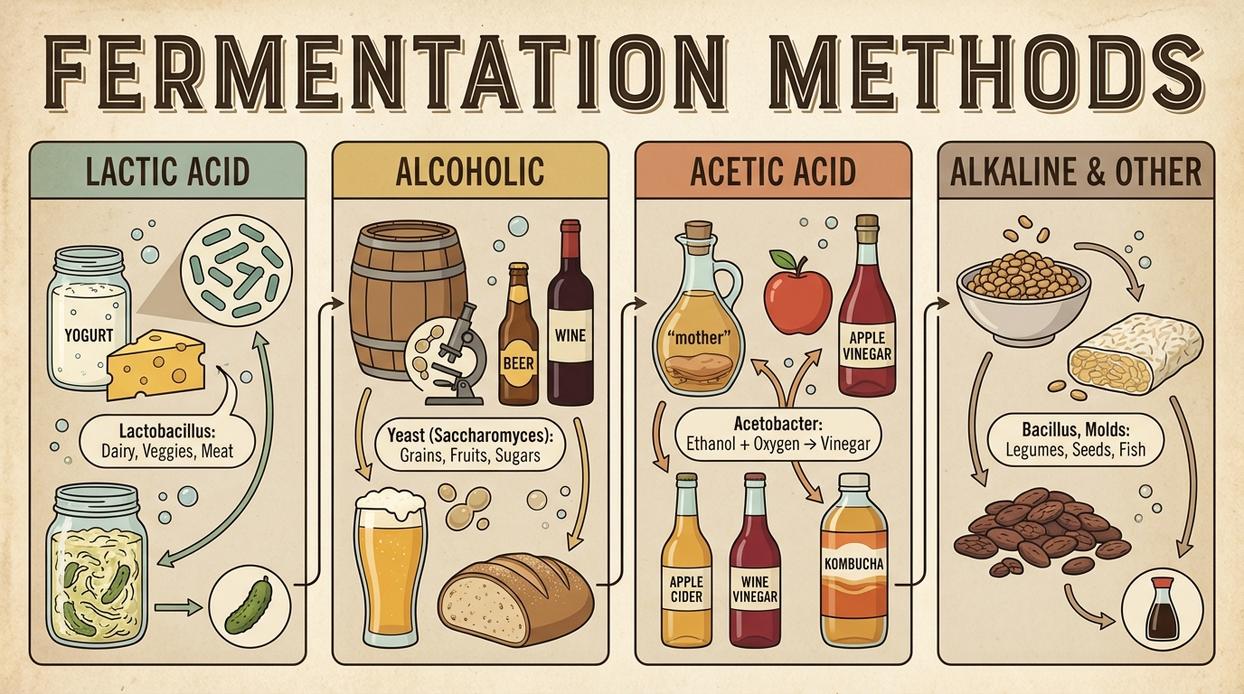
Method 1: Lactic Acid Fermentation (For Sauerkraut, Kimchi & Pickles)
By mastering fermentation techniques, you can not only enhance flavors naturally but also ensure that your creative concoctions align beautifully with the recipe ratios discussed in our article on achieving consistent results – for more details, check out our Understanding Recipe Ratios for Consistent Results.
Back in 2020, when home kitchens turned into DIY labs during global lockdowns, lactic acid fermentation had a serious revival. People weren’t just baking sourdough—they were transforming their leftovers into small-batch wonders (hello, kimchi in mason jars).
So what exactly is it?
This technique uses Lactobacillus—a naturally occurring bacteria—to convert vegetable sugars into lactic acid, preserving the food and giving it that signature tang. The key? An anaerobic (oxygen-free) and salty environment. Salt pulls moisture from veggies, which becomes the protective brine.
The process has stood the test of time—from Korean kimchi cellars centuries ago to modern countertops. Here’s how it works:
- Preparation: Shred or chop your vegetables (think cabbage, radish, or cucumbers).
- Salting: Either massage in salt until juices release or soak in a saltwater brine.
- Submersion: Pack tightly into a jar and weigh it down (floating veggies = mold risk).
- Fermentation: Cover loosely and leave it at room temp. After a few days, bubbles indicate life.
Pro tip: After three days at around 68–72°F (20–22°C), the magic kicks off. But full flavor? You might want to wait a week.
Fermentation techniques like this one don’t just preserve food—they elevate it. (And yes, your ancestors would absolutely approve.)
Method 2: Alcoholic Fermentation (For Beer, Wine & Cider)
Here’s the deal.
If you’re diving into homebrewing or just curious about how your favorite Pinot or pale ale comes to life, learning this process is a must. Alcoholic fermentation isn’t just science—it’s art, history, and flavor chemistry in a bottle.
At its core, this method relies on yeast breaking down sugars into ethyl alcohol and carbon dioxide, giving your drink both its buzz and its bubbles. Whether you’re into craft cider or a deep-bodied stout, this step is non-negotiable.
Still, one question keeps popping up: Should you go wild—or play it safe with cultivated yeast?
Wild fermentations are unpredictable (think of them as jazz), sometimes brilliant, sometimes…not. Cultivated yeasts, meanwhile, offer control, consistency, and cleaner flavors. For most beginners (or anyone who doesn’t enjoy dumping ruined batches), we strongly recommend cultivated strains.
Ready to Try It? Do This:
- Pick your base: Grapes for wine, apples for cider, grains for beer.
- Keep it clean: Sanitize everything — bad bacteria are not your friends.
- Control the temp: Yeast loves the 65–75°F range.
- Use fermentation techniques to tailor flavors — let time and technique shape your final product.
Pro tip: Always use an airlock. It’s a tiny, affordable device that can save your entire batch from turning into vinegar. (Seriously, don’t skip it.)
Method 3: Acetic Acid Fermentation (For Crafting Homemade Vinegars)
Start with an anecdote about a kitchen experiment gone right—but almost didn’t.
I once forgot a half-finished bottle of wine in the pantry for a few weeks. When I finally opened it, I expected vinegar—and I wasn’t disappointed. That “mistake” piqued my curiosity, and soon I was deep-diving into acetic acid fermentation, the same process that turns forgotten wine into sharp, complex vinegar.
Here’s the thing: while some folks shy away from making vinegar at home, thinking it’s either too delicate or too scientific (spoiler: it’s not), the actual process is approachable, with just the right mix of science and… waiting. The secret? Letting Acetobacter bacteria do the heavy lifting—with plenty of oxygen to keep them happy.
The Process, Simplified:
- Start with Alcohol: Use a fermented base like wine, beer, or cider.
- Add the ‘Mother’: Drop in a mother of vinegar (a cellulose-rich SCOBY).
- Encourage Airflow: Cover with a breathable cloth—fruit flies are fans of vinegar too.
- Taste Test: Give it 4–8 weeks. It’s done when it smells like salad dressing and feels like it could clean your countertops.
One fermentation technique, countless flavor profiles.
Pro Tip: Darker containers slow down spoilage; vinegar loves oxygen, just not direct sunlight.
And hey, if you’re the type comparing air frying vs convection baking which is better, you’ll appreciate how this method balances old-world tradition with modern kitchen hacks.
Method 4: Symbiotic Fermentation (For Kombucha & Water Kefir)
There’s something quietly magical about walking into a kitchen where kombucha is mid-ferment. The faint vinegar tang wafts through the air, layered with mellow tea notes. A big glass jar glows amber on the counter, topped with a floating SCOBY — thick, rubbery, and slightly alien-looking (like a jellyfish from a sci-fi B-movie).
This is symbiotic fermentation in action: a flavorful partnership between bacteria and yeast.
Some skeptics say it’s too high-maintenance. You have to “feed” it? Like a pet? But that’s the beauty of it — the SCOBY or kefir grains are alive, and in return for a little sugar water or tea, they give you treasure. Think sharp, tangy sips with just enough fizz to tickle your tongue.
Here’s how it works:
- Feed the Culture: Brew sweet tea (for kombucha) or dissolve sugar in water with minerals (for kefir).
- First Ferment (F1): Drop in the SCOBY or grains, and let it sit. The mixture will gently bubble over 2–5 days.
- Second Ferment (F2) (optional): Remove the culture, bottle the liquid with herbs or fruit, then seal. That’s where the fizz gets serious.
- Repeat: The culture’s ready for another round.
Pro tip: Add a slice of ginger in F2 for a spicy, effervescent zing.
Your Fermentation Journey Begins Now
You came here curious about how fermentation works—maybe even a little intimidated. Now you know the way forward.
We broke down the process into four essential techniques: lactic acid preservation, salt curing, aerobic fermentation, and cultured fermentation. No more guesswork—just clear, hands-on methods that transform ingredients and flavor.
Fermentation isn’t just trendy—it’s a powerful skill. It helps you preserve your food, boost its nutrition, and unlock bold, global flavors right in your kitchen.
You’ve satisfied your intent: understanding the how and why behind fermentation.
What’s next? Choose the technique that excites you most. Get your ingredients. Get started.
We’ve helped thousands simplify fermentation with clear instructions and flavor-focused guides. Ready to taste the difference?
Start your first batch today—because better food begins at home.
 Andrea Malonecion writes the kind of modern cooking techniques content that people actually send to each other. Not because it's flashy or controversial, but because it's the sort of thing where you read it and immediately think of three people who need to see it. Andrea has a talent for identifying the questions that a lot of people have but haven't quite figured out how to articulate yet — and then answering them properly.
They covers a lot of ground: Modern Cooking Techniques, Tutorial Treasures, Ozvelex Fusion Cuisine Experiments, and plenty of adjacent territory that doesn't always get treated with the same seriousness. The consistency across all of it is a certain kind of respect for the reader. Andrea doesn't assume people are stupid, and they doesn't assume they know everything either. They writes for someone who is genuinely trying to figure something out — because that's usually who's actually reading. That assumption shapes everything from how they structures an explanation to how much background they includes before getting to the point.
Beyond the practical stuff, there's something in Andrea's writing that reflects a real investment in the subject — not performed enthusiasm, but the kind of sustained interest that produces insight over time. They has been paying attention to modern cooking techniques long enough that they notices things a more casual observer would miss. That depth shows up in the work in ways that are hard to fake.
Andrea Malonecion writes the kind of modern cooking techniques content that people actually send to each other. Not because it's flashy or controversial, but because it's the sort of thing where you read it and immediately think of three people who need to see it. Andrea has a talent for identifying the questions that a lot of people have but haven't quite figured out how to articulate yet — and then answering them properly.
They covers a lot of ground: Modern Cooking Techniques, Tutorial Treasures, Ozvelex Fusion Cuisine Experiments, and plenty of adjacent territory that doesn't always get treated with the same seriousness. The consistency across all of it is a certain kind of respect for the reader. Andrea doesn't assume people are stupid, and they doesn't assume they know everything either. They writes for someone who is genuinely trying to figure something out — because that's usually who's actually reading. That assumption shapes everything from how they structures an explanation to how much background they includes before getting to the point.
Beyond the practical stuff, there's something in Andrea's writing that reflects a real investment in the subject — not performed enthusiasm, but the kind of sustained interest that produces insight over time. They has been paying attention to modern cooking techniques long enough that they notices things a more casual observer would miss. That depth shows up in the work in ways that are hard to fake.